Hello lovely crocheters!
I didn’t post on my blog for a long time now. I was working on cute baby booties all the time. You can find new cute patterns in my Craftsy, Ravelry and Etsy store.
I can say, I am not the best friend of plants. I forget to water them or I water them too much. Most of them die in a few months and I am always in awkward position when I get flowers as a gift because when the person comes back next time, there is a good possibility the flower is long gone by then.
Recently I saw the pictures of cute crochet cactuses on Pinterest. I loved the idea and today I will try to recreate it. The crochet cactus can be a nice home decor or a great gift for your friend or family member.
Enjoy!

Materials
- Yarn: DK weight, 100% Cotton yarn in green and brown color, 50 g (1.75 oz) of each (you can use any DK yarn you want)
- 3.25 (D/3) mm crochet hook
- Yarn needle
- Stitch markers
- Flower pot (I use Ikea PAPAJA plant pot, diameter 12 cm (4,75”) in yellow color http://www.ikea.com/us/en/catalog/products/50221259/)
- Stuffing (fiberfill)
Gauge: 20 sts and 23 rows in sc measure 4 x 4 inch (10 x 10 cm)
Stitches
- BLO/FLO – back/front loops only
- st/ sts – stitch/stitches
- Ch – chain
- SS – slip stitch
- Hdc – half double crochet
- Hdc2tog – join 2 half double crochet together
- FPdc – front post double crochet
- FPhdc – front post half double crochet
[adinserter name=”REKLAMA 1″]
First of we will start with brown yarn and we will be working on soil/earth part.
Work in rounds.
Note: Ss at the end of the round does not count as a stitch!
Chain 2.
Round 1: Work 8 hdc into the 2nd chain from the hook. Join the round (gather the first and the last stitch) with ss. (8 sts)
Round 2: Work 2 hdc into the same stitch 8 times. Join the round with ss. (12 sts)
Round 3: Repeat (2 hdc into the same stitch, hdc into the next one) 8 times. Join the round with ss. (24 sts)
Round 4: Repeat (2 hdc into the same stitch, hdc into the next 2) 8 times. Join the round with ss. (32 sts)
Round 5: Repeat (2 hdc into the same stitch, hdc into the next 3) 8 times. Join the round with ss. (40 sts)
Round 6: Repeat (2 hdc into the same stitch, hdc into the next 4) 8 times. Join the round with ss. (48 sts)
Round 7: Repeat (2 hdc into the same stitch, hdc into the next 5) 8 times. Join the round with ss. (56 sts)

Round 8: You will be working in BLO. Only in Round 8! Hdc into next 56. Join the round with ss. (56 sts)

Round 9: Repeat (Hdc2tog, hdc into next 5) 8 times. Join the round with ss. (48 sts)
Round 10: Hdc into next 48. Join the round with ss. Fasten off. (48 sts)

Now take the green yarn and start to work on the cactus.
You will be working in rows.
Note: Ch 1 at the end of the round does not count as a stitch!
[adinserter name=”REKLAMA 2″]
Ch 28.
Row 1: Start in the 2nd chain from the hook. Hdc into next 27. Ch 1. Turn. (27 sts)
Row 2 – 32: Work FPhdc around the first stitch. Work FPdc around next 25 sts. Work FPhdc around the last stitch. Ch 1. Turn. (27 sts)
At the end of the row 32 cut the yarn, leave long tail for sewing.

Now sew the shorter sides of your work together as seen on the picture.

Place your work in front of you, hole should be on the top and the bottom.

Sew the top of the cactus together and leave longer tail.

Turn the cactus inside out and fill it with stuffing around the strand of yarn in the middle of the inner side of the cactus.
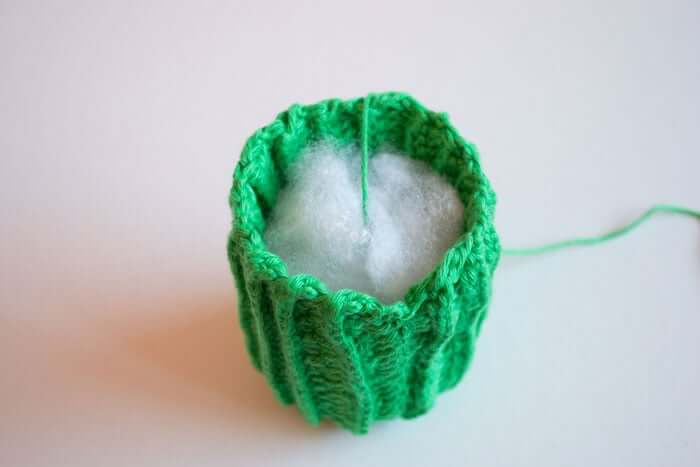
Take the green yarn and attach it on the lower side of the cactus. Now make stitches around the bottom of the cactus. Pull the yarn and close the hole only half way.

Pull the yarn from the middle of the cactus through the middle of the soil part.

Now sew the cactus on the soil.

Pull the yarn from the middle of the soil part to make a nicer shape of the cactus and attach it on the bottom part of the soil.

Place the stuffing into the plant pot beneath the soil part and you are done.

Note: Do not fill the plant pot beneath the soil part with too much stuffing. The cactus will start to fall on one side.
You can also glue soil on the sides of the plant pot if you want. You will prevent the cactus of falling out.
Tada!

This pattern is a property of Croby Patterns and is for your personal use only. You can not modify, sell or share this pattern. You can sell finished items made from this pattern but please clearly credit the design to me, Croby Patterns. Please provide a link to my blog crobypatterns.com. Permission is not granted for mass production or factory manufacturing of any kind. Thank you for respecting me and my work!
5 comments
Good idea in fact!!!! Nice pattern
I love to knit and crochet
[…] Cactus Crochet Pattern. […]
Mine turned out great!!!
I am having trouble loading the download of the ugg inspired baby bootie. Can I have some help, please? The pattern is adorable and I would love to be able to crochet it.
Thanks!